UPDATE: NEW clearer photos taken with the Canon camera I forgot the first time I went with NEW information (like how it closes, and how the lace is done, as well as where some of the bodice seams definitely are under the lace). You can find those new photos and some updated information on this news page!
~*~*~*~*~*~*~
On Monday, during a Girl Scout meeting (during a time when the girls were doing an activity we adults couldn’t help with), I saw that the ball ensembles from Labyrinth were in Seattle, and I screamed and freaked out my troop. But…Labyrinth! And since there are stunningly few photos available showing Sarah’s ball gown in any detail, I knew I had to go. So on Tuesday, after our ballet classes, my daughter and I started the 6-hour drive (stopped for the night after an hour and a half, then the next morning, we hit rush hours traffic through several cities, including Tacoma as well as Seattle, though the return drive was a mere 4.5 hours) drive up to the Museum of Pop Culture. One membership purchase later…
All photos open larger when clicked.
And these weren’t the only ensembles of the day. Stay tuned for Princess Buttercup’s wedding gown from The Princess Bride, and Dorothy from Wizard of Oz (yes, this has been done before, but I got information I haven’t seen mentioned elsewhere), among others! Subscribe to this blog at the bottom of any page to get notifications when those go up I will also do a separate study on Jareth’s ball ensemble. This study will stay focused on Sarah’s gown.
If you need a refresher, take a couple minutes and enjoy this video.
To start, how about a couple videos I took?

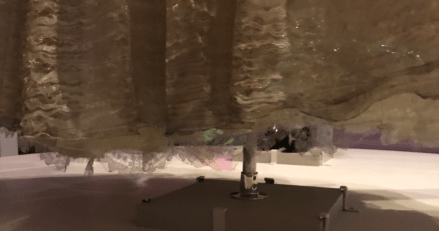
Let’s begin this discussion with the skirt. Not including the pannier under it, this skirt is six layers. The bottom layer-sandwich is a lining of cotton muslin with an iridescent layer that looks like yellow-tinted cellophane (certainly not the iridescent fabric we can fine easier today), with a layer of soft white, almost a very soft dove grey, and silver lace. The cellophane is scalloped at the bottom. Each scallop is about 4″ wide. The lace is a synthetic fiber, and also has a scalloped edge. For the 80’s, back when everything was higher quality, this was a cheap lace. These days, it’s a higher quality lace. How ironic.

The top layer-sandwich is similar. It’s backed with muslin, and the cellophane is the sort that is pinkish green. In photo 2, you can see that the two cellophane layers are different shades. This cellophane is scalloped at the bottom, but I couldn’t see the edges in the lifted part to tell if it’s also scalloped, or cut straighter there. The pinkish cellophane is topped with a fabric I haven’t seen since the 80’s, and haven’t been able to track down yet. It’s not quite a crinkled organza, more puckered similar to seersucker, but in wider, irregular stripes, and it has silver threads running through it. I’m not even sure if this exact fabric is even made anymore, though I do recall having a dress made with it when I was a kid.

An interesting thing I noticed is that on the far sides, additional stripes are added at the very bottom, about 3″ at most, and tapering down. At first I saw it only on the right side, but upon closer looking for quire a while, I was able to make out the extension on the other side. I speculate that the reason for this is that the fabric, which was used lengthwise around the gown instead of in panels, wasn’t wide enough to go from the waist, over the panniers, and to the floor, or wherever they decided to hem it (could have been ankle length, I don’t know since I don’t know Jennifer Connolly’s height). Had those sides been left shorter, it would have been noticed, and shortening the entire gown 3″ would have been noticed. The extensions are sewn on with zigzag stitching. In photo 4, you can see a darker line from the right side that angles down. This is one of the extensions. In my first video, at 44 seconds in, I point it our clearer, and for the one on the right, it’s at 2:19 on my second video.
The hemming on the muslin and topmost layer are just zigzag-stitched, which is very, very, very, surprisingly common on film gowns. It’s not like viewers are going to see the hem or inside seams, and rarely do these gowns have to last for months on end, of not years, the way Broadway and opera gowns need to. I doubt anyone noticed the repair to the hem in the back, and I’m going to include people who go to see this gown in person. Even in person, these small details are only going to be noticed by people who are looking for them. Like me, and the people who are interested enough in this gown to find this post about it.

The fabric in both front and back are gathered in deep Kingussie pleats, 11 to each side. The best way to describe these pleats, since this type isn’t often called that, is knife-pleating where the edges all point one way on one half, and the other way on the other half. On this gown, the pleats on each half point toward the center, either back center or front center. They aren’t very regular in width that can be seen, and that’s likely due to the fabric being pulled over those panniers, and then gathered on the left in front, further pulling on the fabric. I highly doubt that the creators of this gown would have just gone willy nilly on those pleats.

The top layer is hitched up at the left hip, with the bottom 6″ or so left to drape down. The decoration acting as a clasp is very unusual and almost rough for a gown as ethereal as this one. It looks like large beads and those glass stones used in fish tanks gathered in fine gold netting, and is something I’d expect to see on a mermaid gown. If you click on photo 6 to make it larger, you can see a bit better than the gold mesh is just a mishmash of beads and glass stones. It’s interesting, but seems out of place to me. I’m guessing this is to represent gems and such mined from the earth by goblins. That’s certainly why I used real pearls on the Goblin Queen gown that my daughter and I created.

Now to the bodice. Oh, where to begin with this one. The sleeves. These giant fluff balls are a combination of the pinkish cellophane from the top layer-sandwich of the skirt and the lace used on top of the bottom layer sandwich. They are so perfectly balloon-like that it’s easy to think that there are balloons in them! However, they didn’t use balloons. I’m sorry to burst any dreams of balloons in sleeves. What was done instead was to make a very full and stuffed short sleeve as an inner sleeve, and a big huge puff outer sleeve consisting of the cellophane and lace for the puff, with a fitted lower sleeve (I hope it was lined with cotton, but can’t be sure). When sewn together and to the bodice, the stuffed short sleeve supports the outer sleeve. Believe it or not, this was a common sleeve method using sheer fabric for the outer sleeve during the Romantic era of the 1830’s!

A few more details to note:
The bulk of the gathering is kept to the top of each sleeve. This gives the effect of the sleeves being ready to fall off of Sarah, yet are supported enough to still puff hugely.
The right sleeve has a frill of tulle. The left one didn’t, but that could have been lost. The sleeve lace was tucked upward in the center, and the frill inserted into that. This was then sewn to the bottom of the inner sleeve.
Also, if you look in photo 8, you can see added lace at each sleeve cuff. This lace is silver, and the only other place I saw lace this silver was at the neckline and waist, which I will cover momentarily.

The bodice itself, which is definitely boned according to the plaque accompanying the ensembles, appears to have seven panels and has princess seams in front and back with seams at the side. These panels were really hard to see on the gown in person, though slightly easier to see in photos. I searched for seams in the lace, but found none. So what must have been used is a couture method of shaping lace to conceal seams. How this is done is by assembling the rest of the shell, in this case, more of the pinkish cellophane, and at least one supporting layer, which could be cotton muslin or something more substantial to handle the boning that was used on this gown, and taking a large piece of lace over the front. In areas that need to be shaped, carefully cut along motifs where needed, lay and manipulate flat, pin, and baste into place. Do this on all the areas needing to be shaped. If need be, add more lace and conceal the joins the same way. When all basted and smooth, hand-sew the edges down. You shouldn’t see lace seams at all now.
Yes, that’s time-consuming, and yes, the margin of error is high, and yes, this requires top-notch hand-sewing skills to be able to sew invisibly, and yes, this requires being extremely flexible and being willing to work with unexpected behaviors in lace. This is why it’s a couture method and so often skipped in favor of visible seams and calling it part of the design. There’s nothing wrong with visible seams when they’re genuinely desired (and sometimes they are, especially for bodices we want to have the visual appeal of a corset), but for when a magical fit with lace is desired, enter lace-shaping!

The bottom of the bodice has 1/8″ piping with the lace over cellophane, and, though not visible, that had to have had some of the muslin lining it. Making piping of cellophane and lace alone is asking for it to tear. The back closure can’t be determined with any certainty. It looked to be hooked-and-eyed. However, it’s not unusual for actresses to be sewn into their gowns. Just recently, Lily James was confirmed as having been sewn into her blue ballgown as Cinderella. So either of those are possibilities for this gown. Definitely no buttons and definitely no zipper.
As for adornments, there are very few. Motifs of silver lace are applied over the neckline in front and back, as well as some around the bottom of the waist, which is pointed in back as well as front.

Speaking of the front, getting clear photos of the beading just wasn’t happening, no matter how hard or how often I tried. I suppose it’s some consolation that the studio headshot of Jennifer Connolly, which are clear enough to show individual strands of hair, couldn’t photograph it clearly either.
There’s a single large plastic gem front and center, with some rocaille bugle beads, but as for what the yellow is, I couldn’t tell in person, and still can’t tell. At times they look like silk ribbon, and at other times, yellow beads. I hate to have to take a wild guess on something I got to see in person, but I think that the yellow on top and bottom (refer back to photo 6) are a combination of silk flowers and crystal, with a few pearl beads scattered in. The yellow in photo 11 looks very bright, but that entire photo has been lightened. It’s much softer in person, much lower contrast.

The neckline has a couple asymmetrical details, only one of which is still present on the gown. The ruffle on the left shoulder (right side when viewing it straight on in photo 11) is still there, and it’s more lace. The detail on the other shoulder has disappeared. Photo 12, which is a screenshot from one of my video, lacks it. But photo 11 shows a single shabby yellow that appears to be made of feathers, with a small fall of some sort, possibly other feathers. Something I learned at the exhibit is how much Jim Henson and his crew, including Brian Froud, loved to use feathers. This was so, so incredibly amazing to get to learn through personal observation of Fraggle puppets and several there iconic pieces. So if I had to wager on that flower, it would be feathers.
More photos will be posted to this Facebook album. I will be heading back to the museum rather shortly as my husband wants to see the indie video game exhibit (and it’s just plain an amazing museum). If there are other details you want to see that I didn’t capture, or there are any questions, please let me know and I will be glad to try to find out the answers for you!


